

Every woman wants long thick hair at one point or another in their life. Call it a phase but its all I've wanted for my own hair for around a year now. There are SO many options for adding length to your hair. They all have their pros and cons but it can be fun to try every option you have.
Definitions
...
- Weave- Hair that has been applied to the existing natural hair to add length, volume, and color.
- Virgin Hair- Hair from a donor who has not applied chemicals like bleach or hair color to their hair. Also no chemical texture services have been done like perms or relaxers.
- Remi Refined Hair- The hairs cuticle is partially removed so that the hair will not lock or mat and it can be less expensive than turned or remi hair.
- Fallen Hair- Hair that has been shed from the head and gathered in a hairbrush. The cuticles of the strands will move in different directions instead of all pointing downward causing it to easily tangle.
- Turned Hair(Remi Hair)- The root end of every strand of hair has been sewn into the base of the hairpiece. This is so that the cuticles of all the hair strands move in the same downward direction making it tangle less. This is costly but a beautiful natural looking option for hair extensions.
- Bulk Hair- A pack of loose strands of hair bundled together. This type of hair comes in longer lengths and usually comes synthetic. You pull how ever much hair you want off of the bulk or out of the bundle and apply it to the hair. Bulk hair can be used as filler also.
- Track Hair- Track hair is attached to a weft of fabric that can be glued or sewn into the hair.
- Feed-In Method/Filler- Taking bulk hair and integrating it with the natural hair while braiding the hair down into cornrows. It strengthens the braid and allows it to last longer and look more natural. Filler is great for making fake buns as well.
- Kanekalon- This is a high quality synthetic hair than can sometimes withstand high heat. This brand of synthetic hair can resemble human hair very closely and is very soft to the touch. It wont tangle easily and can be washed and styled multiple times. Its durability makes it a great option.
- Nylon/ Rayon Synthetic- This is a less expensive option for synthetic hair. It will reflect light and come across shiny as well as break the natural hair off when braided to the scalp. Beware of shampooing this hair often because it can lose its durability. You can not apply heat of any kind to it.
- Yarn- It can be made of a cotton or nylon blend and can be found anywhere selling crafting supplies or fabric making it very affordable. It comes in a wide variety of colors, will not reflect light and look shiny, and will give off a matte finish to the braids. The yarn will swell when filled with water but the good news is it wont slip from its base making it durable. Just assure you don't get black and blue yarn mixed up. Keep your receipt!
- Yak- A strong durable fiber that comes from a domestic ox found in Central Asia or Tibet. The hair is shaved from the animal and sold alone or mixed with human hair to remove the manufactured shine.
- Lin- This is a very pretty wool fiber from Africa. It has a matte finish and comes only in black and brown. It will come on a roll to pick your own length and size. Beware applying heat to this fiber because it is very flammable.
- Cornrow- Also known as a canerow or a visible braid is done by doing a 3 strand underhand braiding technique. These are narrow rows of visible braids that are close together and directly on the scalp. Cornrows can be worn by anyone in varying sizes and designs. Many braiders believe this reduces tangles in the hair.
- Braid Pattern- When creating a base to apply synthetic hair to one technique is to braid the entire head of hair down into cornrows in a pattern. This pattern can have horizontal, diagonal, vertical, or curved.
- Beehive- The beehive braiding pattern is achieved by starting a cornrow at the nape of the neck. The braid follows the curve of the head in a clockwise pattern until the middle is reached.
 |
| Beehive Braiding Pattern |
 |
| Straight Back Braiding Pattern |
Human V.S Synthetic Hair
...
The Test...Take a piece of the hair and pull it off to burn it over a non-flammable surface. Synthetic hair will ignite immediately and ball up or shrivel/melt into nothing. Human hair will take awhile to burn and smell horrible but Kanekalon Hair will extinguish itself.
Human Hair Pros:
- Human hair of course looks and feels more natural.
- It can be washed and have heat applied to it just remember to use a heat protectant.
- You can take care of human hair just like you would your own hair including dying it your own hair color.
- This hair will last longer and look better over time.
- Less tangles and knots over time than synthetic hair.
- You can cut and style the hair anyway you'd like.
Human Hair Cons:
- This hair is more expensive because of the better quality. Human hair comes from a donor typically living in China or India.
- Unfortunately human hair reacts to the elements just as your natural hair would. It could frizz up or lose its curl easily.
- Human hair will oxidize its color meaning if you dye the extensions they could fade with exposure to light.
- The hair can become damaged just like your own hair. Heat and brushing the hair to often could cause it to break off.
Synthetic Hair Pros:
- The technology for making synthetic hair pieces has greatly improved for instance Kanekalon Hair which is a modacrylic fiber synthetic type of hair.
- Synthetic hair is cheaper than human hair and can be a few dollars a pack.
- The hair is usually ready-to-wear which is easy to maintain at home. The style will not change if it gets wet.
- Most are pre-cut and won't need any customization.
- There is a limitless range of colors, textures, lengths, and brands.
- The color will not oxidize or fade even when exposed to the sun.
Synthetic Hair Cons:
- You can not apply heat to synthetic hair unless stated otherwise on the packaging. Some synthetic hair is coated with a protein base and can have heat up to 390 degrees Fahrenheit applied to it. Always test a strand first before applying heat.
- Normal hair color will not be able to dye the synthetic hair therefore it can not be colored.
- The thickness and shininess can make synthetic hair look unnatural.
- The best looking synthetic hair can get pricey.
Cost
...
Quality and cost go hand in hand. Human hair can come from all over and where it comes from can also determine the quality leading to its cost.
- European Hair- The most expensive with virgin hair being the biggest expense and color treated hair right under it in price.
- Indian/Asian Hair- Most commercial human hair comes from these countries. Indian hair can be found in a wavy texture from 12-16 inches in length and Asian hair comes in a straighter texture from 12-28 inches in length. Indian women shave their heads as a religious sacrifice and donate the hair to their temples. The virgin Indian hair is then cleaned, prepared, shipped, distributed, and sold to us here in the U.S.A.
- Human/Animal Mixed Hair- This kind of hair is next in cost and can come from animals like horses, yaks, and sheep. The purest white hair comes from the animals belly and can be dyed fantasy vibrant colors.
- Human/Synthetic Mixed Hair- This type of hair is usually half human hair and half synthetic hair. This type of hair is great for people just wanting to experiment with hair extensions. It's less costly and easier to get.
Questions
...
Ask the vendor questions before purchasing hair. You don't want to get conned into getting charged a high price for low grade hair. If they can not answer your questions it could be a sign that the hair was illegally obtained or that the vendor isn't trained/educated on the hair they are selling.
- What kind of hair is this?- Is it made of human hair, animal hair, mixed, or synthetic/synthetic blend.
- Is this virgin hair?- Has the hair been textured or colored.
- How is the hair graded?- If the hair is human then is it graded by strength, elasticity, and porosity.
- Is the cuticle intact?- If the cuticle is intact it will be more expensive like turned or remi hair.
- Is it fallen hair?- The opposite of remi hair and less expensive but still a great quality of hair.
- Is it tangle free?-If the cuticle or protective outer layer of the hair has been removed then you may not be able to condition the hair without it getting matted.
- Whats its condition?- Has it been bleached or colored with metallic dye and can it be permed.
- Will it match my hair?- Ask their opinion on how well the texture and color matches your hair. Sometimes you need an outside perspective.
- How long will the hair last me?- Hair additions should last 4-6 months with repetitive use.
Removable Hair Extensions
...
Most hair extensions can be removed after a period of time with no issues which can make them very low commitment.
Clip- In Extensions...
These are very common and you can get these very cheap or very expensive. They come in every color of the rainbow and can be a great way to add a pop of color. They come in human hair and synthetic with the human hair extensions being more expensive. These can be worn daily and taken out to shower and sleep in.
Who should wear a cap wig...?
 3/4 Wig...

Lace Front Wig...
Sock Bun- This hairpiece comes with 2 options


How To: Synthetic Bun- If you want a straight look try using the Kanekalon hair

Integration Hairpieces...
- Pros:
- Easily Accessible- These can be found in places like the mall to high end salons.
- Budget Friendly- Depending on the length and quality
- Variety- Lots of options when it comes to the color, length, texture, brand, etc.
- Easy To Use- Human hair extensions can be taken care of just like your natural hair.
- Heat- Human hair extensions can be curled and straightened easily.
- Easy To Apply- They just clip right into your hair.
- Cons:
- Can Break Hair- Can cause hair breakage and balding.
- Can look Unnatural- If used incorrectly the extensions may appear unnatural looking.
- Not For Thin Hair- If you have thin or thinning hair then clips- ins can be easily seen or cause excess thinning.
- Not For Curly Hair- These type of extensions can become tangled or cause excessive damage to curly hair when worn. It could also be hard to blend the exact texture with your own varying curl pattern.
- Life Expectancy- Clip- in hair extensions can look frizzy and matted or become damaged just like your own hair from heat or from being exposed to the elements.
- Tips:
- Invest in human hair extensions if you plan to wear the extensions more than once a week for longer then 30 days. You get the most options when it comes to styling this way.
- Tease the hair in the spot where you plan to place the extension to assure a good hold.
- Do not wear extensions in the same location for extended amounts of time or they could break your hair off and create balding.
- Take care of human hair extensions by washing them once a week and letting them air dry lying flat or hanging from a pant hanger.
- Use a wide tooth comb or a wig/weave brush to maintain the hair.
- Do not let your extensions lay out around the house. Take the time to put them away when your not wearing them. Make sure they wont get balled up or tangled and that they will stay cool/dry.
- When using heat on your human hair extensions use a heat protectant to extend the hairs life expectancy.
- Do your research before purchasing the most convenient hair extensions. There are so many options out there and you don't want to be an uneducated consumer because you could end up paying a high price for bad quality hair extensions.
Wigs
...
A full wig conceals 100% of the hair beneath it.
Cap Wig...
This has a net or mesh-fiber base where the hair is attached. These usually come hand- knotted and they need to be fitted. The front hairline is made to resemble the natural hairline. Because these wigs are hand- tied under the net to conceal the caps edge they can become very expensive. They look very natural and can be worn every day.
Who should wear a cap wig...?
- Thin Hair
- No Hair/Balding
- Cancer Patients
These can be called caps and are machine- made from human or synthetic hair. The hair is woven into wefts, which are long strips of hair with a threaded edge. These are then sewn to elastic strips in a circle formation to mimic the head shape. These are more popular ready-to-wear wigs and can be less expensive. They are light and comfortable to wear because of the open areas in the frame. They let your scalp breathe and are easy to put on.
 3/4 Wig...
This type of wig does not cover 100% of the head but instead only 3/4 of it. Some of the most popular options cover everything but the parting of your hair (called a 3/4 U-part wig) in which you blend your own hair over the wigs opening.


1/2 Wig...
A half wig can also be called a 3/4 wig because it covers more than literally half of your hair. It should be worn right behind the ears and usually has a comb at the top and bottom of the hair piece. Some even come with drawstrings.You can part your hair off in the front and lay it over the half wig to blend it in.

These wigs are some of the most natural looking full coverage wigs you can get without buying a hand- tied wig. The front has a translucent mesh that is cut down to size. It allows the wig to have the appearance of a natural hair line.
 |
Hair Pieces...
Ponytails, buns, and braids can all be easily added to the hair with a synthetic hair piece. They come in all colors, textures, styles, and lengths. They are very easily found and most are budget friendly. I find them easy to use and maintain at home as well. Some come with combs and drawstring closures built in.
- Synthetic Hair Bun- This usually has combs or snap shut closures along with drawstrings built into it. You put your hair into a ponytail and tuck the ends of your hair inside of the bun.

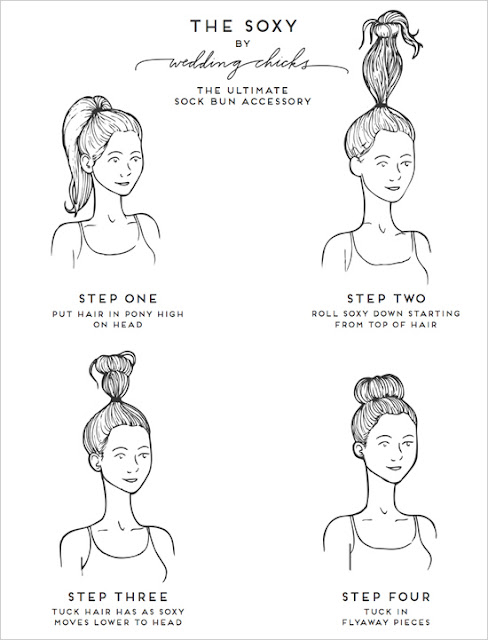
- Sock Bun- You can put a sock bun to use with your own hair. You put your hair into a ponytail and pull your hair through the hole of the sock bun. You then wrap your hair around the bun or flower the hair over the bun to conceal it beneath your own hair. This creates a clean polished full bun with your own hair.


How To: Sock Bun-
- Get 1-4 old socks in a color matching closest to your hair color. The thicker and longer your hair is the bigger you will want your bun meaning you will need more socks to get the desired size.
- Cit along the seam for the toe area of each sock.
- Slip them over your arm layering them evenly on on top of the other.
- Starting at the top closest to your shoulder begin to roll all of the socks together downward towards your hand.
- The sock should form a doughnut shape perfectly. Remove it from your hand stretching out the hole by pulling evenly on both sides.
- Take a needle and thread and sew along the loose edge of fabric all the way around the bun.
- Admire your new bun!


- Put your hair into a ponytail with an elastic or bun it completely.
- Take Kanekalon hair or any bulk hair and fold it in half holding it at the fold.
- With your other hand twist the bulk hair like you would your own ponytail around itself.
- Take the folded end and pin it to the scalp at the base of your ponytail.
- Continue to twist the hair and begin to wrap it around the base of your ponytail. It will pile up on top of itself which is fine.
- Take your own hair and smooth it down over the bun you've created with the Kanekalon hair unless you've bunned your own hair under the bulk hair. Find the center of the bun and let your hair flower out from that point. Use gel and a comb if needed to keep smooth.
- Pin the hair at the base with hair pins which come long and short. Tuck the ends into the bun or pin them down if showing
- Secure with an elastic, headband, or a ponytail hook. Add a bow or a fake flower to accessorize.

A hairpiece that has openings in the base, through which you pull your own hair through to blend with the synthetic hair. These are very budget friendly and easy to find.
 Synthetic Ponytails...

Some half wigs can be worn farther back on the head as a ponytail when used with a drawstring closure. You can purchase ponytails that integrate your own hair or conceal it beneath.


Starting Dreadlocks:
Crotchet Braids...
Crochet braids or a latch hook weave is a natural and protective styling technique where the hair is corn rowed as a base. You use a tool called a latch hook or crochet needle to apply bulk hair or pre-braided extension hair to the corn rows.

Pros:


 |
Braid-and-sew Attachment Method... Sew In's
The hair is braided down to the scalp usually in cornrows and then the weave/tracks are sewn on top of the braids with a needle and thread. It is considered a "full" sew in when no natural hair is left out. A partial sew in can have as much "leave-out" as you want. You can leave just enough hair out to cover a parting or everything in front of your ears can be left out if you just want fullness and length in the back. These are popular among every ethnicity and many celebrities wear them because sew ins look like a natural head of hair.
Tips:
Tips:
- The angle of the track determines how the hair will fall.
- Position the wefts about 1 inch behind the hairline.
- Use a blunt straight or curved needle to avoid damage to the hair.
- Try adding a hair net over the corn rowed base to provide more protection to your natural hair by relieving some tension caused by the thread.
Bonding Method
...
Hair extensions, wefts, or bulk hair strands are attached with adhesive or a bonding agent. The adhesive is applied with an applicator gun created specifically for bonding in a salon or comes in a squeeze applicator bottle at your local beauty supply store.
Tips:
- The hair needs to be at least 4 inches long to conceal track hair.
- Keep tracks at least 1 inch behind the hairline for coverage.
- Keep the hair you use 12 inches or shorter to reduce the wefts being pulled out by the weight of the hair. It could also break your hair off from the weight.
- The bond will sit snugly to the scalp but can slip down a little bit so attach as close to the hairline as possible.
- The fake hair is fast to bond to your own hair so don't apply the glue until your ready to install each track.
- This will last up to a month and can be done with store bought bonding glue at home.
- If you wet or shampoo your hair the glue can easily dissolve so I would use glued in tracks as a temporary means for length only until you want to wash your hair again. Oil will dissolve the adhesive as well as store bought bond remover.
- Do not apply tracks to closely to the crown or the parting area to avoid visible tracks.
- This is very affordable and easy to get the hang of with a little practice.
- Do not use the bonding method if you have thin or thinning hair, if you have severe damage, or very oily hair.
- Patch test the adhesive you chose before applying it to your scalp because some people may have an allergic reaction to the glue.
- Part off hair at the nape to cover the track if you pull your hair up.
- Measure the weft against the parting and cut to size.
- Lay the weft flat and apply the adhesive along the top of the weft in a thin line.
- Let the glue dry slightly until tacky or it could ooze onto the hairline and dry in the hair.
- Lightly press the weft glue side down against the parting as close to the scalp as you can.
- Hold for 20 seconds without pushing and gently tug to assure it has adhered.
- Continue to part of the hair working your way upward leaving at least 1/2 inch parting in- between each track.
Bonding Pros:
- Quick
- Affordable... The glue cost less than $5
- Easy To Use
- Short Term Commitment
Bonding Cons:
- Can Cause Damage
- Hard To Clean Up
- Can Run Into Unwanted Areas
- Unpleasant Odor
Quickweave
...
A "quickweave" is a short term solution to a long term problem. The quickest way to achieve a new look with artificial hair is to use the bonding method at home. The second option for a quick change is to use a quickweave. A hair net, wig cap, or stocking is applied over the unbraided natural hair. The synthetic hair is then bonded to the cap and worn up to 2 weeks without removal.
Step One: Pick a method for covering your own hair.
- Option One: Pull your hair back into a low ponytail. Flip the ponytail up and gel or pin down to your hair as flat as possible. Pull the cap over your head and pull taut just above your ears. You can use a product over your hair designed to protect it from the bonding glue also.
Bonding Hair Shield
- Option Two: Try putting your hair in a low bun at the nape of the beck if the hair isn't to long.
- Option Three: Braid a circular cornrow around the perimeter of your hairline leaving the rest of the hair unbraided in the center. Apply the cap and sew the cap down to the braid with needle and thread. This assures a more secure hold on the cap.
- Option Four: You can braid your hair down as a base and then pull the stocking over the braided hair. You can then use track hair and sew it to the base beneath the net. This can be a good option but it can be hard to maintain your natural hair in the cornrows beneath the net.
Step Three: Measure & cut the wefts to fit its placement on your cap.
Step Four: Apply the hair starting at the nape and working your way up. Check YouTube for detailed videos on the process for adding a bang and closure to the quickweave.
Step Five: Cut, style, and wear your new head of hair proud.
- I recommend adding a second hair net or wig cap over your hair if you chose to leave your hair out underneath. It will assure that no glue seeps through and attaches to your natural hair. It also helps the cap stay on your head.
Fusion Bonding Method
...
Bulk synthetic hair is bonded to a few strands of the natural hair close to the scalp with a material that is activated by the heat from a tool used in the salon. I do not recommend attempting this on your own because it can be very time consuming causing it to have an expensive price tag in the salon. This is a natural and comfortable way to wear extensions. The bonds are lightweight and will allow your hair to move freely. Its an easy to maintain style and will last up to 4 months! The removal process is fast and painless and should be done in the salon.
Braid Extensions
...
Single braids or individual braids can be done with or without extensions. They hang free and can be done by braiding either underhand or overhand. You can create square, triangular, diamond, or rectangular partings for each braid. The parting will determine where the braid ends up and how it will fall or move. Since single braids can move in any direction so make sure to braid in the direction you would like the braid to fall.
- Cornrow Extensions- These are usually braided to the scalp with synthetic hair and the synthetic hair is left showing or the hair is braided all the way down. I don't suggest keeping any cornrows in for over 2 months because the hair grows about 1/2 inch per month meaning by 2 months you will have an inch all over of new growth with cornrows sitting on top. Cornrows can take 30 minutes to a few hours depending on how intricate the braiding pattern is, the length, and the density of the hair.


- Senegalese Twist- These are similar to kinky twist but have a more polished/shiny look to them because Kanekalon hair is typically used and can be worn curly or straight.

- Kinky Twist- I suggest using a textured synthetic hair like Marley or Afro Kinky hair for these twists. They can cost up to $200 in a salon so check YouTube out for how to do them at home.

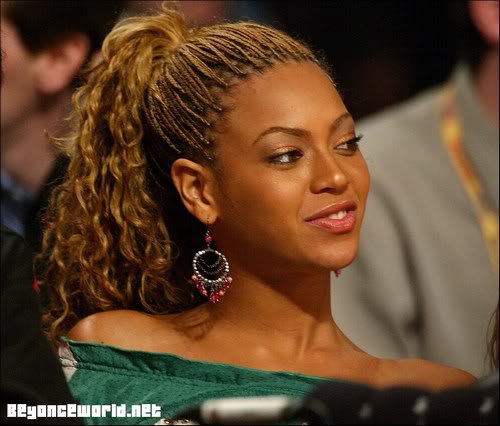
- Micro Braids- I love to get micro braids because they are so small they can be mistaken for a head of hair from afar. You can chose how far down you want the micro braids to be braided before exposing the synthetic hair. Typically you would braid the synthetic hair into your own until just past where your natural hair length falls. This way all of your hair is protected and all you see is the long synthetic hair as shown below. These can take from 8-18 hours to do depending on the how far down you want them braided and your hair density.
- Box Braids- These are done using 3 strands of hair in an underhand or overhand braiding technique. These single free hanging braids are a beautiful protective style and can be worn as long as you want because you will be braiding the hair to the ends.


- Pixie Braids- You need short hair to pull this look off as pixie braids are a quicker version of box braids. The braids are worn shoulder length and above and most women rock them in a bob type style. The ends can be sealed with boiling water or fire causing the ends to curve in slightly towards the face. I suggest using square partings and cutting any synthetic hair in half before application. They can be worn up to 2 1/2 months and you can swim in them making them a great summer protective style.

- Tree Braids- The hair is braided along with the extension usually in a cornrow using a 3 strand underhand braiding technique (cornrow method) close to the scalp or in a single free hanging braid allowing mostly the fake hair to show. It mimics a full sew in because pieces of the synthetic hair as left as you braid but you can see the braids around the hairline. These braids can take from 4-8 hours to install and can be done several different ways. They will last you 2-3 months and look great on anyone.

- Yarn Braids/Twist- These soft lightweight matte braids can be done in any size or length. These twist when done at home can be very budget friendly. I suggest using acrylic yarn and avoiding the wool one as it can dry out your hair. The ends must be sealed with this hairstyle.

- Genie Locks- These have a natural and lightweight feel to them. They will not need to loosen up so you can style them the day you get them. You will have less tension on the scalp and hair than with other braids/twists so the itchiness is reduced.Your hair will be more resistant to breakage while wearing this protective style and will be soft after removing the yarn. The ends of this hairstyle must also be sealed.

- Rope Twist- These are done by dividing a small section of hair in half. Both halves are twisted clockwise and then joined together in the same twisting method overlapping each section of hair forming a tight twist. These will last up to 3 months if maintained because the twisting method reduces the amount of frizz. I suggest using Kanekalon hair for this style.

- Dreadlocks- Also known as locks are free hanging separate networks of intertwined and meshed together hair. This does not need to have hair added to it but it is a possibility. The hair locks in a few slow stages over the course of 6 months to a year depending on hair length and texture. They can be done in varying thickness and when done thin enough can resemble strands of hair. These can be achieved through several methods.

Lock Phases...
- Phase One: The beginning stage is when the hair and coil is soft and smooth. The end is open and the coil will have a shiny/glossy texture to it.
- Phase Two: The prelock stage is when the hair starts to mesh together, the locks will puff up get bigger in size.
- Phase 3: The sprouting stage is when a bulb can be felt starting to form at the end of the loc and the hair meshes even more.
- Phase Four: The growing stage is when the hair begins to get some length and even though the locks may be frizzy you can have some solid areas.
- Phase Five: The maturation stage signals the locks being closed at the ends. The hair will have a matte look to it and will be dense.
Starting Dreadlocks:
- Comb Technique- When the coil of hair is still open on the end (the beginning stage) you can place a comb at the base of the scalp and rotate it while spiraling the hair into a curl. With each revolution of the comb the hair will move down until it reaches the end of the hair shaft. It makes a tight coil and is good for 1-3 inches of hair.
- Palm Roll- This is the most gentle option and can be used during all the stages of locking. Apply gel to damp sections and place one section on your palm. Close one hand over the other and roll the hair in one direction between your palms. As you move down the hair it will coil helping to shape and maintain the dreadlocks.
- Braids/Extensions- Take the desired size and shape sections and braid it to the end in a single overhand 3 strand braid. Synthetic fiber, human hair fiber, or yarn can be added into the braid. The braid will slowly lock over time. Once an inch of hair is grown you can begin to palm roll the braids to form the dreadlocks.
Crotchet Braids...
Crochet braids or a latch hook weave is a natural and protective styling technique where the hair is corn rowed as a base. You use a tool called a latch hook or crochet needle to apply bulk hair or pre-braided extension hair to the corn rows.

Pros:
- No Chemicals
- No Glue
- No Thread
- Natural Looking
- Budget Friendly
- Safe
- Easy
- Quick
Tips
...
- Maintaining your new hair can be easy once you get a routine down. For human hair I suggest treating it gentler than your natural hair but you don't need to really change your hair products. The rule of thumb is less is more because the hair can look weighed down or oily easily.
- If you have synthetic hair I do not recommend washing it by directly applying shampoo or conditioner to it as it can mat or look frizzy after drying.
- If your hair is braided beneath as a base don't forget to maintain it! Just because its braided away doesn't mean it doesn't need TLC. I suggest washing the cornrows once or twice every 7-10 days. By washing the cornrows the hair gets clean as well when the shampoo or conditioner runs out of the hair.
- Cornrow Shampoo-
- Fill a water/applicator bottle halfway with water.
- Add in a quarter sized amount of sulfate free shampoo.
- Shake to mix well and apply/spray in between the cornrows.
- Rub it in with your fingers and rinse with warm water.
- Cornrow Conditioner-
- Fill a water/applicator bottle halfway with water.
- Add as much conditioner as you please.
- Add a dime amount of your favorite oil.
- Shake well and apply.
- Rub it in and rinse with warm water.
- Finish with a cool not cold rinse to seal in the moisture.
- You can wash human hair before applying it to your hair if you want by doing a cowash method.
- Cowashing Human Hair Extensions-
- Remove all packaging from the hair.
- Saturate the hair with warm not hot water.
- Apply the conditioner in a downward direction from top to bottom.
- Rinse and lay out to air dry. While rinsing color could leak from the hair. This isn't a bad thing because you can tell whether the hair has been dyed or is dirty this way.
- Before applying track hair try sealing the wefts with a sealant to prevent shedding and fraying. This is especially helpful when you cut track hair to fit. The ends of the track where its been cut can come apart.
- If you spend good money on good hair then don't throw it away. Most human hair can be washed and reused over and over again. I've heard at most remi hair being used up to 4 times for 2 or 3 months at a time.
- Before a weave I suggest washing your hair and trying to pack in as much moisture as you can by doing hot oil rinses, protein treatments, or deep conditioning treatments which you can learn more about in my Repair Your Hair blog post. If your hair needs trimmed then I suggest doing that before installing synthetic hair as well.
- If you have chemically treated/damaged hair or thinning hair then corn rows can cause a lot of stress on your hair. I recommend adding filler hair to the cornrows to strengthen them. By braiding the synthetic hair into your natural hair it makes your hair a much stronger base for weave installation. Another option is to use a net on top of the cornrows to prevent tension on the cornrows from the needle and thread.
- Give yourself plenty of time to install the hair. Whether you go to a salon or do it at home I recommend giving yourself a full day to spend on your hair. A full head of hair can take hours to install and you don't want to be late for work because you weren't able to finish your hair.
- My last tip would be to let your hair rest after taking out the artificial hair. Leave 48 hours minimum in between hair installations. Your hair can get dry and damaged being braided down all the time. Braids done close to the scalp can put tension on the softer hair around the hairline like the edges. This hair can break off causing bald spots. When thinning occurs take a break from braiding your hair as the tension can lead to permanent balding. Too tight cornrows can also cause irritation leading to open wounds on the scalp.
My Half Wigs
...


~"I cosmetically & psychologically transform self images and destinies of fellow human beings." - Dr. Lewis Losoncy~
Check Out Other Great Blogs...


